Dec 19, 2012

Decorative Branches | Christmas DIY

Around Christmas I tend to see different coloured plastic branches in home stores and I've been toying with the idea of making my own and I really like the way they turned out. Not only did I get to personalize the branches, but finding them was a fun little outing! So, here's how you can do it yourself..

Step one

Go out and grab some branches! Don't break them out of trees yourself though, we're not out to harm nature and live branches are not as easy to break off as you may think. Trees shed branches all the time so if you look around the bottom of a few, you'll be able to find some nice ones.

Step two

Pick up some snow spray, glitter spray, coloured spray paint, or whatever you want to use to decorate your branches. This is what I used:


Step three

Lay down some newspaper (consider doing these next steps outside if you can) and spray the surface of your branches with your chosen spray. Let it dry for around 10-15 minutes.


Step four

Once that's dry you can flip the branch over and do the same thing to the other side. Don't forget to let it dry!


Step five

Arrange the dried branches in a vase. I used leftover globes from our Christmas tree in the bottom of the vase but there are a lot of other options like pebbles, larger stones, beads, etc.
Hope you give this a try!


xo Dani

Dec 17, 2012

Christmas Red and Gold | Polish of the Week


With Christmas a mere 10 days away, I'm feeling festive and nothing encourages festivity like red and gold. My red nail polish is Stiletto Red by Rimmel Lasting Pro Finish which is one of my favourite drugstore nail polish brands. It has a wide brush which makes application easy and the colour payoff is really nice. I put on 2 coats to make sure it lasts a long time but one coat gave me a good amount of colour as well. The gold is Golden by Revlon Top Speed polish and this one definitely dried faster than my red. The brush of this polish is more narrow so if that's your preference this brand is definitely for you. I love the gold colour because it isn't glittery and it is more brassy rather than bling blingy. Yes, that is the official term!


xo Dani

Dec 13, 2012

Elephant Walk by China Glaze | Polish of the Week


During the month of December, I tend to gravitate towards red nail polish shades but this week I was feeling a bit "adventurous" and opted for a gray colour I've been meaning to wear for a while. This is Elephant Walk by China Glaze. It is really opaque (the photo has two coats but one coat was pretty thick). In terms of quality, China Glaze polishes tend to be on the right side of awesome with a staying power of over a week without chipping. The brush is a good side and application is super easy. On top of all this, whenever I read the name, I am immediately transported to a safari, watching the elephants meander around while holding on trunk to tail. Too cute.


xo Dani

Dec 12, 2012

No-sew Christmas Stockings | Christmas DIY

What you'll need:


Coloured felt (I chose 3 different colours but you could go for more or less colours)
Clothing glue
Scissors or an exacto-knife
A pencil
A ruler


Steps to follow:

1. Use the pencil to mark out the dimensions of your stocking. Remember that you will be losing some of the size when you glue the two sides together so trace your pattern a little bigger than you want the stocking to be. This is roughly the pattern I used, you can change the dimensions based on how big you want your stocking to be. The best bet is to use your ruler to make points and then trace them out with a pencil into your desired shape. Here's what mine looks like. I pretty much kept to the pattern. Once you have your shape drawn up, you can cut along your pattern with your scissors or exacto knife.


2. For the second half, you can simply trace out your first half. It doesn't have to be exact because when you place the glue down you can be more precise. Once you've drawn it, cut it out. Now you have your two sides!


3. Carefully (!!) take the glue along the the outside of one of your stocking halves, making sure not to put any glue on the top as that would close the top of your stocking.Then, place the other half down onto the glue. LET IT DRY BEFORE DOING ANYTHING ELSE. Clothing glue doesn't take too long to dry, but to be on the safe side, I would suggest leaving it for at least 10-15 minutes. When you think it's dry, give the each side a light testing pull. If the two halves don't budge, you're ready to turn your creation inside out. Do this gently. You can also use your fingers to push the different round parts into place. It'll look a little funny at first but you can flatten it down with your hand, felt is quite malleable.


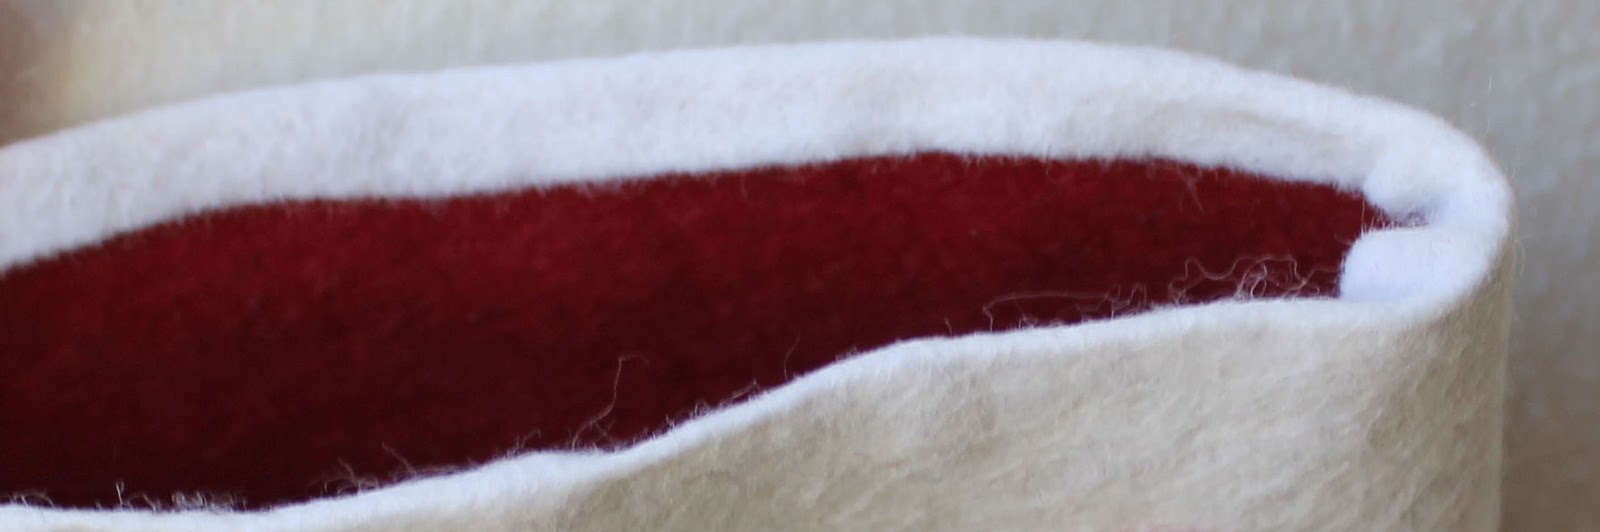
4. The look of your cuff is very flexible. Whether you like a large cuff or a small one, all you have to do is glue one length all the way around the inside of your stocking. To do this, line your cuff with glue on one length but take your time pressing the gluey side into the inside of the stocking in order to ensure the cuff will be straight. Let that dry for 10-15 minutes and give the glued sections a light tug to make sure everything is set in place before you move on to the next step.


5. You want to glue the other end down onto the stocking. If you want a flat look, place the glue on the underside of the cuff and simply press it down onto the stocking. I went for a more dimensional look: place the glue in a line directly on the stocking and fold the very edge of the cuff so that a small part of the outside surface of the cuff is glued to the stocking. Do this in small sections to ensure you get a straight line around your stocking. Don't forget to let this dry for 10-15 minutes before doing anything else.


6. The hook is optional but I find that it makes the stocking more authentic and easier to hang. I just took some leftover felt from the stocking body section, cut a thin strip, and glued it to the inside corner of the stocking.


7. Finally, no stocking would be complete without a little decoration. I cut out letters from my third colour and glued them onto the cuff to personalize the stocking. I also used leftover felt to make a small holly corner border for a festive feel. 


Try to let your entire stocking dry for a couple of hours before you hang it. Gravity will help it flatten to a more stocking shape and all your glue will have ample time to dry and set. Now your stocking is ready to be hung!


xo Dani

Nov 20, 2012

Which bra are you missing? | Everyday Essentials

Last night I picked out a one shouldered, partially sheer shirt I've been wanting to wear for a while only to realize that wearing said shirt would involve me either pairing it with a bathing suit top or forgoing a bra completely. Needless to say, the shirt spent the evening securely in my closet, but it got me to thinking that I was missing an essential bra in my collection. Now I’m here to make sure you don’t find yourself in such a predicament! Whether you’re traveling or you've lost all your clothing and need to start anew, these are the essentials:

Number 1: The black bra
This one is cotton but get one you like!

This one is essential. Good for dark shirts and dark tank tops that show your bra straps. Also it’s good for those days when you want to feel a bit sexy but don’t want to go all out with a lacy red bra. In my opinion, there’s nothing sexier than a nice black bra.

Number 2: The nude bra
Get one that matches
your skin tone

This one is self-explanatory. You've got anything from a white shirt to a light coloured shirt to a sheer shirt covered. Alternatively, a white bra works just as well, it just depends on your skin tone and which look you prefer.


Number 3: The strapless bra
A satin material will
work with both dressy
and casual clothes

Here’s the one I’m missing. If you’re only going to have one, I would go for a nude colour. If you don’t feel comfortable without straps, clear straps work well too. If you get this multi-way bra, it can double as your nude bra.

Number 4: The sexy bra
Find something
you absolutely love!

This one can be whatever you feel good in. Lace, silk, red, black, purple, hot pink. This one is a double push up for that extra bit of sexiness. This is where you can have a bit of fun and choose something you feel great in!


Number 5: The sports bra
Choose a fun colour, there's
no judgement at the gym!

Personally, I’m a workout fanatic, but even if you don’t happen to share my affliction, a good sports bra is useful during anything remotely active and also comfortable to sleep in or go around the house. 


If you check the links, you'll notice I used Victoria's Secret and Nike bras but that's only because they are easy to get a hold of in most places and do international delivery. Also, they're kind of the best in their respective fields.

That’s it, hope it helps you be more prepared than I was!

xo Dani

Nov 13, 2012

Wine and candlelight | How to Have a Romantic Evening


I love unplanned romantic evenings. The original plan was to quickly eat dinner then go to the gym together. I ended up cooking chili which took a good deal longer than I had originally planned for dinner. 4 hours and half a bottle of wine later, my boyfriend and I are enjoying a long conversation and the calming sounds of a Spanish guitar in the glowing warmth that follows a delicious meal. For the recipe I used, and a tonne of other awesome ones, check here. I have a habit of matching my music with my meals and, yes, I know chili originated in Texas or the American Southwest or whatever you want to call it, but for me, eating chili makes me think of an acoustic guitar playing music in a distinctly Spanish style. Needless to say, we never made it to the gym. I had a really nice evening nonetheless and fully recommend it. The candle I was burning is by Slatkin & Co. (found at Bath and Body Works) and smells like its namesake Spiced Apple Toddy. They sell a similar smell at Ikea during the holiday season that I've become quite a fan of as well.


What do you do to relax with your significant other?

xo Dani